Best Fertilizer for Calathea (2026): What Actually Works
And What Burned My Plants
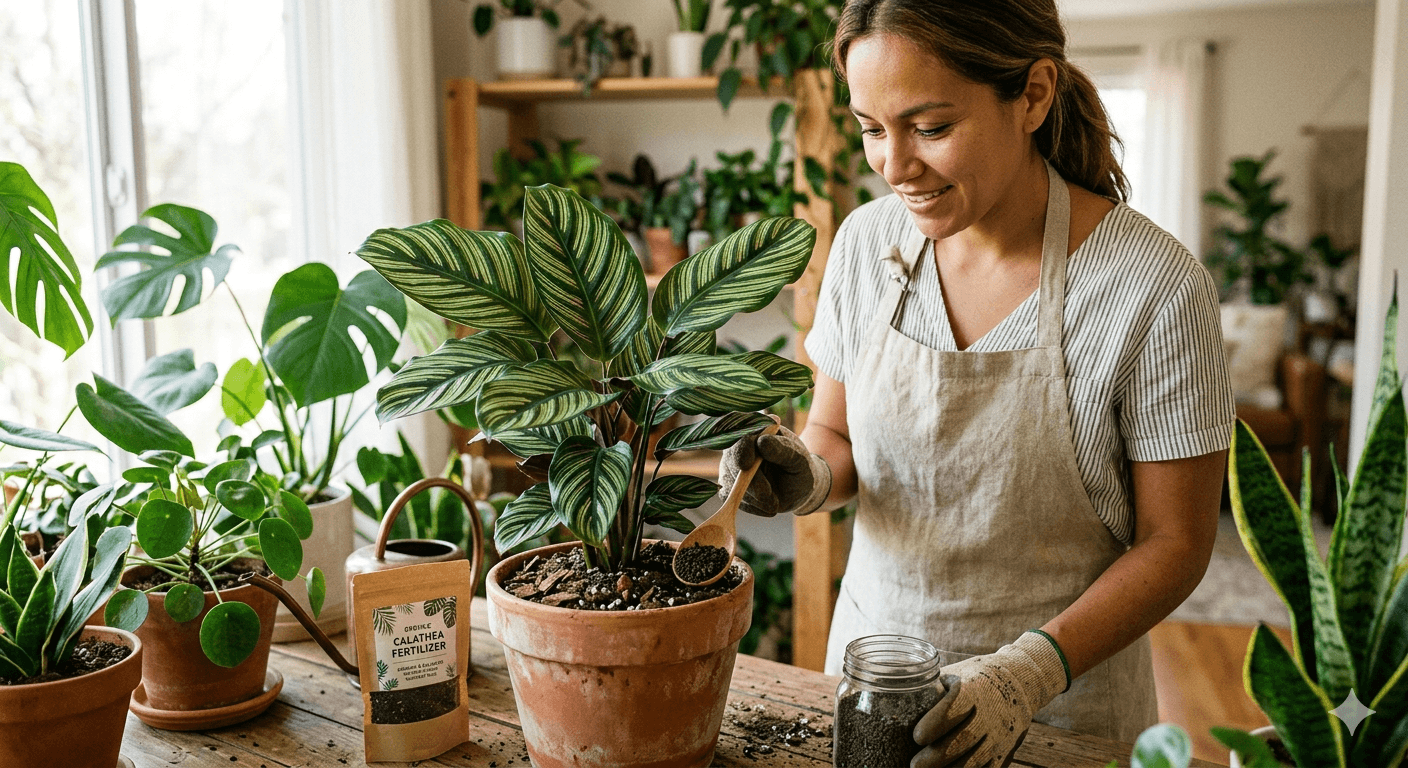
Nobody tells you that calatheas are one of the easiest plants to accidentally poison with fertilizer. I found out the hard way — three times — before I finally understood what they actually need.
Picture this. You have been growing a Calathea ornata for four months. The leaves are perfect. The stripes are vivid pink. It is putting out new growth every couple of weeks. You feel like you finally know what you are doing.
So you decide to give it a boost. You grab the liquid fertilizer you use on everything else, measure out the recommended dose, and water it in. Job done.
Ten days later, the leaf tips start going brown. Then crispy. Then the edges start dying back. Within three weeks, the plant looks half-destroyed. And you have no idea why, because you did everything right.
That was me in year one of keeping calatheas. The frustrating part is that I was not being careless. Following the label exactly, using a good quality fertilizer, watering it in properly — and still causing serious damage. Something was clearly wrong with my approach, not the plant.
Why Calatheas React So Badly to Standard Fertilizers
The real issue is not the fertilizer itself. Calatheas are built differently from almost every other houseplant people commonly grow. Having evolved on the forest floor, nutrients arrive slowly through decomposing leaves rather than in concentrated doses. Their roots simply are not designed to handle the kind of chemical load that a pothos or a monstera takes without blinking. If you also grow monstera, you can see how we approach fertilizing that plant differently in our guide to the best fertilizer for monstera.
Once I understood that, everything changed. I stopped following generic houseplant advice and started paying attention to what these plants were actually telling me. Now my collection of twelve calathea varieties gets fed on a simple, consistent routine that produces steady growth and zero leaf burn.
Here is everything I learned, including the mistakes that cost me some genuinely beautiful plants.
Top 5 Best Fertilizers for Calathea (Quick Answer)
Editor’s Quick Picks
Why Calathea Fertilizing Is Different From Other Houseplants
Most houseplants tolerate a range of fertilizer types and doses. Calatheas do not.
Root sensitivity is a core part of what makes calatheas challenging. Stress shows up immediately on the leaves. Being native to the tropical forest floor, these plants are used to very gentle, slow-release nutrition from decomposing organic matter, not concentrated synthetic feeds. Research from the University of Florida confirms that tropical foliage plants like calathea have significantly lower fertilizer needs than most outdoor crops.
What Happens When You Over-Feed a Calathea
The moment you over-fertilize, salts build up in the soil. Those salts pull moisture away from the roots. The plant responds with brown tips, crispy edges, and sometimes complete leaf drop.
This is why the best fertilizer for calathea is almost always a gentler option than what you would use on a tomato plant or even a pothos.
The Best Fertilizer for Calathea: My Top Picks After Years of Testing
Synthetic Liquid Fertilizers (Most Control)
Balanced Liquid Fertilizer at Half Strength
A balanced NPK like 10-10-10 or 20-20-20, diluted to half the recommended dose, is what I use most often.
The key word is half. About 2.5ml per liter of water instead of the 5ml the label suggests is my standard mix. Once a month during spring and summer works well, skipping it entirely from October to February.
The results have been consistent. Steady growth, no burning, no drama.
Nitrogen-Forward Formula (3-1-2 Ratio)
Some brands make fertilizers with a slight emphasis on nitrogen, something like a 3-1-2 ratio. Nitrogen supports leaf production. Since calatheas are grown entirely for their leaves, a mild nitrogen-forward formula makes sense.
I switched to this for one of my Calathea orbifolia and noticed slightly faster leaf production compared to a perfectly balanced formula. The difference was subtle, but real.
Organic Fertilizer Options for Calathea
Prefer a no-burn approach? These organic options feed gently and are much harder to over-apply.
Worm Castings (The Safest Option I Have Ever Used)
This is the one I recommend to beginners without hesitation. Worm castings are basically the gentlest plant food that exists. They release nutrients slowly, improve soil structure, and it is nearly impossible to over-apply them.
I mix about a tablespoon of worm castings into the top inch of soil every 6 to 8 weeks. The plant gets a slow, steady supply of nutrients without any salt buildup risk. I have never seen a single case of fertilizer burn using worm castings on a calathea.
Fish Emulsion (Smelly But Surprisingly Good)
Fish emulsion came onto my radar after reading about it in an old gardening forum. Skeptical at first — the smell is genuinely awful, like a pier on a hot day — but the plants responded really well.
But the plants responded really well. Fish emulsion is high in nitrogen and delivers it organically, which means it releases gently. I used it at quarter strength, once every six weeks, and the growth response was noticeably positive. If you want to explore more organic feeding approaches, our guide on how to make organic liquid fertilizer at home covers several DIY options worth trying.
Slow-Release Granular Fertilizer
Slow-release granular fertilizers like Osmocote can work, but they are risky with calatheas because you cannot control the release rate precisely. If temperatures rise or you water heavily, they can dump nutrients faster than expected.
I have used them successfully by using about half the recommended amount and only during the active growing season. But if you are newer to calatheas, stick with liquids or worm castings first.
The 3 Best Fertilizer Products for Calathea
After testing a lot of options, these three kept showing up as the most reliable, safest, and easiest to use correctly.
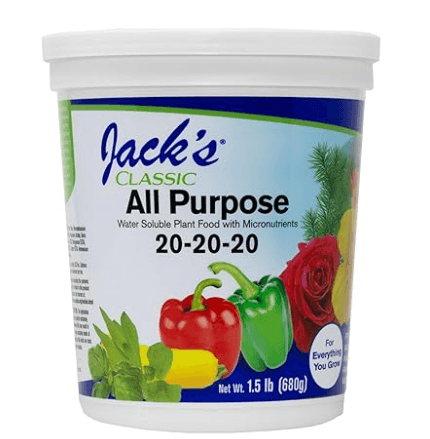
This is the one I come back to most often. It is water-soluble, dissolves completely, and gives you full control over how much you apply. The 20-20-20 ratio sounds high, but at half strength it becomes a gentle 10-10-10 equivalent. The formula also includes micronutrients like iron, copper, manganese, and zinc, which calatheas genuinely benefit from. No burning, no mystery residue on the soil. Just clean, predictable results every time.
Organic and Slow-Release Alternatives
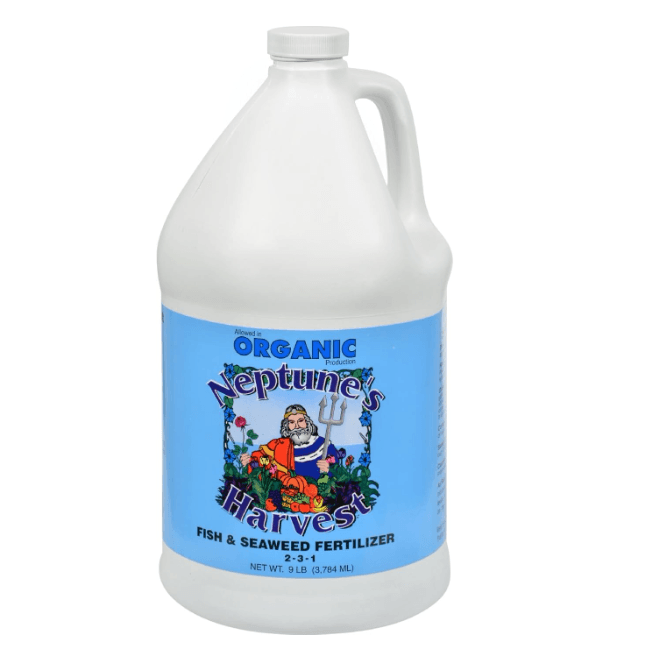
This is the organic option I trust the most. Fish and seaweed together create a nitrogen-rich but slow-releasing formula that mirrors what calatheas would naturally get on a tropical forest floor. The seaweed component adds natural growth hormones and trace minerals that a basic synthetic fertilizer simply does not have. The smell is strong — do not use it in a small room without ventilation — but the plant response is consistently excellent. I use it at quarter strength, every six weeks.
Best Slow-Release Option
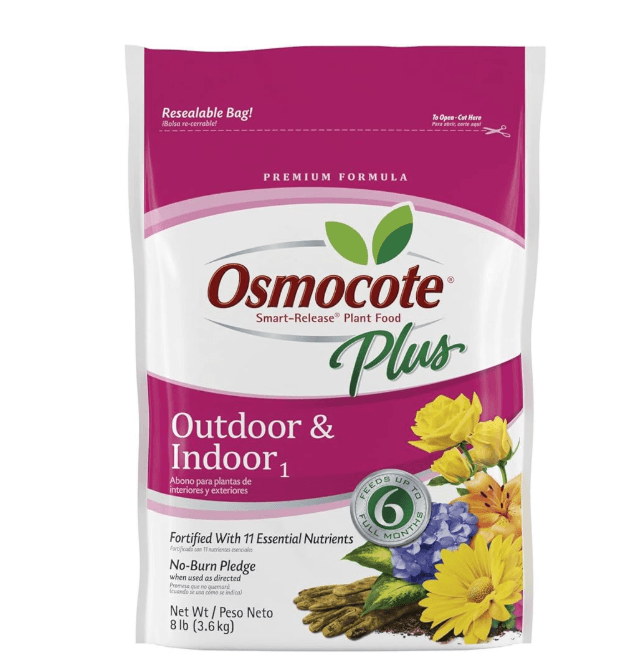
Osmocote is one of the most trusted slow-release fertilizer names in gardening, and for good reason. Each tiny granule is coated in a resin shell that releases nutrients gradually every time you water, feeding the plant consistently without the risk of a sudden concentration spike hitting the roots. For calatheas, I use it at half the recommended quantity and only apply it at the start of the growing season in March. That single application carries the plant all the way through summer with zero fuss. At an NPK of 15-9-12, it leans nitrogen-forward enough to support steady leaf growth — which is exactly what calatheas need. Use less than the label suggests, make sure the pot drains well, and this product quietly does its job all season.
When to Fertilize Calathea (Timing Matters More Than People Think)
Spring through late September is your feeding window — that is when calatheas are actively growing and can actually use the nutrients you give them. Feed once every 4 to 6 weeks with a diluted liquid fertilizer, or every 6 to 8 weeks with something organic like worm castings.
From October through February, stop completely.
Calatheas slow down significantly in winter. Their roots are not actively absorbing nutrients at the same rate. If you keep fertilizing through winter, those nutrients just sit in the soil and build up as salt. That is what causes those brown, crispy leaf edges people complain about in January and February.
Side-by-Side Comparison Chart
| Product | NPK | Type | Burn Risk | Best For | Price |
|---|---|---|---|---|---|
| Jack’s Classic 20-20-20 | 20-20-20 | Liquid powder | Med (dilute!) | Precision feeding | ~$15 |
| Neptune’s Harvest Fish & Seaweed | 2-3-1 | Organic liquid | Very Low | Beginners, organic | ~$14 |
| Osmocote Smart-Release Plus | 15-9-12 | Slow-release granules | Low | Low-maintenance | ~$12 |
The Mistakes That Burned My Plants (And Probably Yours Too)
Mistake 1: Following the Label
Fertilizer labels are written for outdoor plants, garden applications, or more robust houseplants. Calatheas need less. Always use half the recommended dose as a starting point. For particularly delicate varieties like Calathea makoyana or Calathea warscewiczii, I sometimes go down to a quarter strength.
Mistake 2: Fertilizing a Stressed Plant
I once tried to fertilize my way out of a problem. My calathea looked droopy and pale, so I thought feeding it would help speed up recovery. That made things dramatically worse.
A stressed, sick, or recently repotted plant cannot process nutrients — the roots are already under pressure. Sort out the underlying issue first, whether that is watering, light, or humidity. Once the plant is producing new growth again, resume feeding gradually.
Mistake 3: Using Tap Water to Mix the Fertilizer
Fluoride and chlorine are in most tap water — and calatheas are unusually sensitive to both. Mixing fertilizer into tap water and applying it regularly gives the soil a double hit of chemical buildup over time.
Switching to filtered water or rainwater made a noticeable difference in leaf tip health within a few weeks for me. If filtered water is not practical, let tap water sit uncovered for 24 hours before using it. The chlorine dissipates that way, which at least helps.
Mistake 4: Fertilizing a Dry Plant
Dry soil concentrates fertilizer at the root level the moment it lands. That sudden spike is what causes burning — not the fertilizer itself.
Water the plant normally first, wait an hour, then apply the diluted fertilizer. Alternatively, just mix the fertilizer directly into a regular watering. Either method keeps the nutrient concentration safe for the roots.
Mistake 5: Ignoring Salt Buildup Over Time
Even when you fertilize correctly, salts gradually accumulate in the soil. Every three to four months, I flush my calatheas. I run a slow, steady stream of plain filtered water through the pot for a couple of minutes, washing excess salts out through the drainage holes.
After flushing, I wait a week before fertilizing again. This reset keeps the soil chemistry clean and the roots happy. If you prefer to switch to homemade feeds to reduce salt risk altogether, this article on homemade liquid fertilizer for plants has some practical low-salt options.
What NPK Numbers Actually Mean for Best Calathea Fertilizer
NPK stands for Nitrogen, Phosphorus, and Potassium. Here is the practical breakdown for calatheas specifically.
| Nutrient | Role | For Calathea |
|---|---|---|
| N — Nitrogen | Leaf growth and color | Moderate to high. Leaves are everything with calatheas. |
| P — Phosphorus | Root development, flowering | Low. Calatheas rarely flower indoors. Avoid bloom boosters. |
| K — Potassium | Overall health, water regulation | Moderate. Helps but should not dominate the formula. |
A ratio around 3-1-2 or a balanced 10-10-10 at half strength both work well. What you want to avoid is anything very high in phosphorus or potassium relative to nitrogen, like bloom boosters. Those are designed for flowering plants and are not what calatheas need. The same NPK logic applies to most tropical aroids — you can see how we apply it in our monstera fertilizer guide for a direct comparison.
Organic vs Synthetic Fertilizer for Calathea
I have used both extensively, and here is my honest take.
Organic fertilizers like worm castings, fish emulsion, and compost tea are more forgiving. They release slowly, improve soil biology, and are very hard to over-apply. One downside is that they are less precise and some smell unpleasant. According to the Royal Horticultural Society, organic options are recommended specifically for sensitive container plants because slow-release feeds better match the natural nutrient uptake rhythm of most houseplants.
Synthetic fertilizers are precise and immediately available to the plant. They give you more control over exactly what the plant receives. The downside is that they are easier to misuse and contribute to salt buildup faster. University of Maryland Extension notes that over-fertilizing is one of the leading causes of houseplant decline, particularly in species with fine or sensitive root systems.
Beginners or anyone who has struggled with brown tips should start with organics. A diluted synthetic balanced fertilizer works well once you want to dial in your feeding more precisely. You can also read our full breakdown on organic fertilizers to explore what works best for your growing style.
Signs Your Calathea Needs Fertilizer
- Pale, washed-out leaves on new growth — suggests nitrogen deficiency
- Slow growth with no new leaves for several weeks during growing season
- Yellowing older leaves faster than normal — plant pulling nutrients from old growth
Signs You Have Over-Fertilized
- Brown, crispy tips or edges on multiple leaves appearing after fertilizing
- White or crusty deposits on the soil surface — salt buildup
- Wilting despite moist soil — possible root damage from fertilizer burn
If you see any of these after fertilizing, stop immediately. Flush the soil thoroughly with plain water. Cut off the damaged leaves if they are more than 50 percent affected. Give the plant a few weeks to recover before feeding again, and use an even weaker solution than before.
Realistic Costs: What to Expect to Spend
| Product | Approx. Cost | How Long It Lasts |
|---|---|---|
| Worm castings (1kg bag) | $10 – $15 | 6 to 12 months for home use |
| Balanced liquid fertilizer (e.g. Jack’s Classic) | $10 – $20 | 1 to 2 years at half strength |
| Fish emulsion | $10 – $15 | Very cheap per application |
| Slow-release granules (Osmocote) | $10 – $15 | One bag lasts multiple seasons |
You do not need to spend a lot to fertilize calatheas well. A $12 bottle of balanced liquid fertilizer used at half strength will give most home growers a full growing season of feeding with plenty left over.
Advanced Tips Most Articles Skip
The Takeaway
The best fertilizer for calathea is a balanced, diluted liquid fertilizer applied once a month during the growing season, or a gentle organic option like worm castings if you want the most forgiving approach possible.
The most important rule is to use less than you think you need.
I have seen more calatheas damaged by over-fertilizing than by under-fertilizing. These plants are forgiving about being slightly underfed. They are not forgiving about being overloaded with nutrients.
Start gentle. Watch how your plant responds. Adjust from there. Once you dial in the feeding routine, calatheas reward you with some of the most stunning foliage of any houseplant on the market.